Joint Compound for Ceilings: All-Purpose, Topping, or Setting Mud?
After the popcorn texture is gone, the ceiling's look is decided by what you spread on the drywall. All-purpose, lightweight, topping, and setting-type mud each have a specific job — match the product to the layer and the ceiling sands flat in one pass; guess, and you will be chasing swirls and ridges for days. This is written for homeowners around Cary, NC who are looking into joint compound for textured ceiling and want the honest version rather than a sales page.
Match the Compound to the Layer
Joint compound chemistry has to match the specific layer of restoration to deliver a flawless final aesthetic — that is the core rule from slide 7 of our Popcorn Extraction Masterclass. A standard removal leaves the drywall in three conditions at once: taped seams that need reinforcing, scrape gouges and fastener dimples that need structural filling, and a full surface that needs smoothing. Each condition calls for a different product.
The short version
- Joint compound has to match the restoration layer, because a standard removal leaves taped seams needing reinforcement, gouges and fastener dimples needing structural filling, and a full surface needing smoothing all at once.
- All-purpose and lightweight compounds carry the first skim coat and embed the tape joints, with moderate sandability in the 120–150 grit range; lightweight shrinks less and sands faster over a whole ceiling.
- Topping compound is the high-sandability final finish coat, spread thin and cut at 150–220 grit to give paint a uniform surface with no hard spots.
- Setting-type mud, sometimes called hot mud, hardens chemically and belongs in deep gouges and structural patching, where it is applied wet and scraped flat because cured setting mud has low sandability.
- Three mistakes wreck a smooth finish: using all-purpose for the final coat, sanding setting-type mud too early, and reaching for topping compound where tape adhesion or structural fill is needed.
- Bucket compounds dry by evaporation so humid stretches in Cary lengthen drying time between coats, while setting-type mud is less humidity-dependent because it cures chemically.
The deck breaks the options into three working families. All-purpose and lightweight compounds carry the first skim coat and the tape joints, with moderate sandability in the 120–150 grit range. Topping compound is the high-sandability final finish coat that leaves the surface glass-smooth at 150–220 grit. Setting-type mud — sometimes called hot mud — hardens chemically and belongs in deep gouges and structural patching, where you apply it wet and scrape it flat because it will never sand like bucket mud.
All-Purpose or Lightweight: First Skim and Tape Joints
All-purpose compound is the workhorse for embedding tape. It has the adhesive strength to bond paper tape to the board at seams and corners, and it is stiff enough to hold a flat bed of mud behind the tape. Lightweight compound is the better first-skim choice when you are coating the whole ceiling: it shrinks less, feathers easily, and sands faster than standard all-purpose.
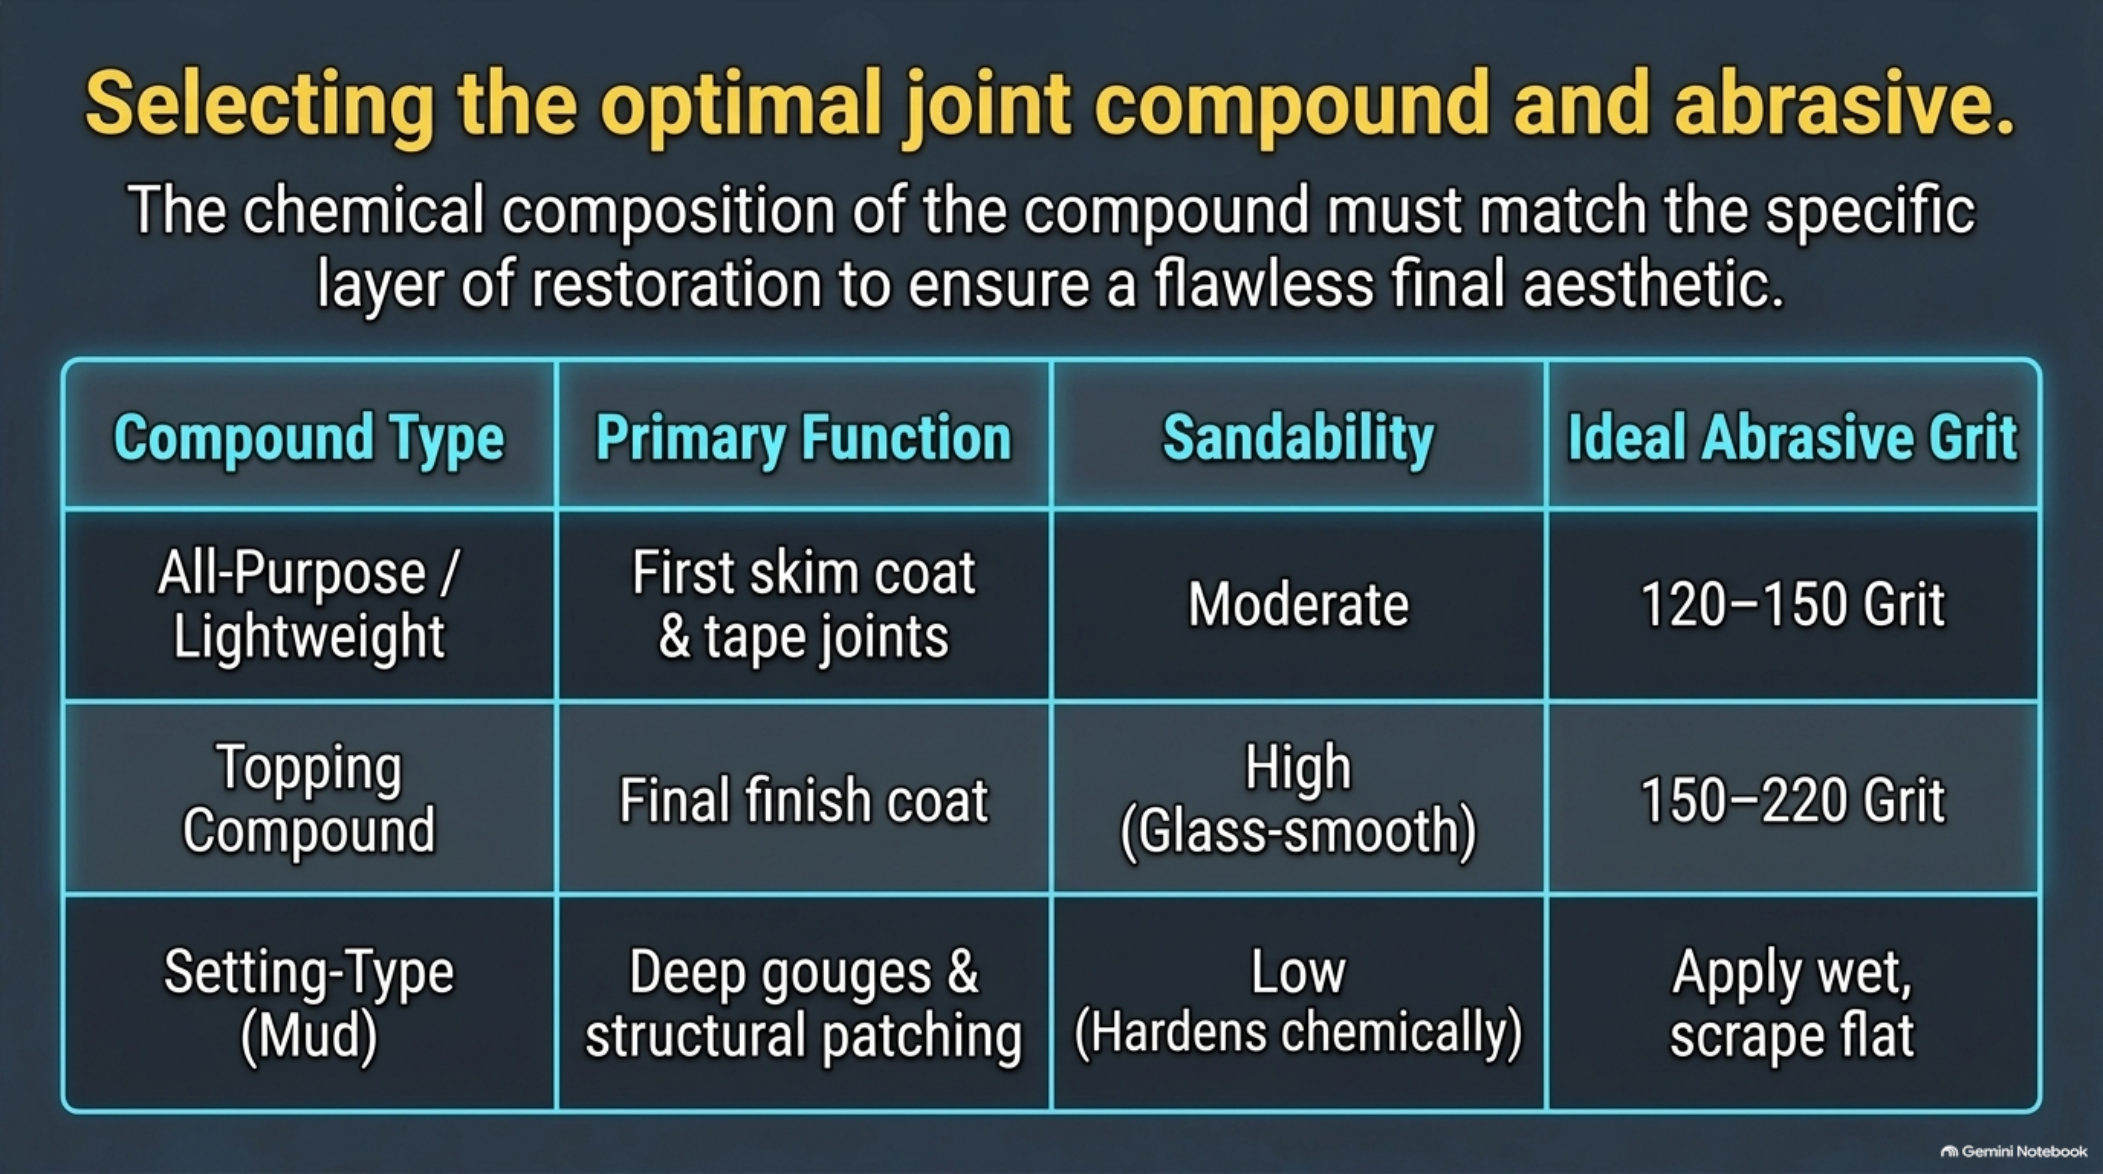
Slide 7 — compound type, primary function, sandability, and ideal abrasive grit. See the full deck walkthrough.
Both sit in the moderate-sandability range, so the deck calls for 120–150 grit here. Sanding the first skim at a finer grit wastes time; this coat only needs to be flat and reasonably smooth because the topping coat is coming. What you are removing is feather-edge ridges and crumbs of dried mud, not a mirror finish.
Topping Compound: The Final Finish Coat
Topping compound is formulated for exactly one job: the final, glass-smooth finish coat. It is finer-bodied than all-purpose mud, dries with less porosity, and — critically — it is rated high sandability, which means it cuts cleanly at 150–220 grit without tearing or balling up. Spread thin, it fills the microscopic pitting the first skim leaves behind and gives the paint a uniform surface with no hard spots.
The trap is treating topping compound like all-purpose. It lacks the body and the adhesion for embedding tape or filling gouges. Use it for what its name says — topping — and it will sand to a surface that catches light evenly.
Setting-Type Mud: Deep Gouges and Structural Patching
Setting-type mud cures by chemical reaction rather than by water evaporation, which is why the deck lists it for deep gouges and structural patching. The wet scrape can tear paper, a dull blade can gouge the board, and popped screws leave craters — repairs that need real strength and thickness in a single fill, not a product that shrinks as it dries.
Because it hardens chemically, setting mud is low sandability once cured. The rule from the masterclass: apply it wet and scrape it flat. Work the fill to nearly its final plane while it is still workable, then leave it alone — sanding cured setting mud is slow, and sanding it before it has fully set smears and tears the surface. The chemical set also means a short working window, so mix only what you can place before it hardens.
How Each Compound Fits the Extraction Workflow
On a typical job, the workflow runs in order after the wet-scrape pass strips the texture. First, repair the board: set or re-drive popped screws, fill gouges and torn paper with setting mud scraped flat, and let it cure — the step-by-step repair process is in our drywall repair guide. Then tape the joints and roll the first skim coat with all-purpose or lightweight compound and sand at 120–150 grit. Finish with a thin topping coat, sanded at 150–220 grit, and you are ready for the raking-light inspection before primer.
Two practical notes for Cary weather. Bucket compounds dry by evaporation, so humid stretches lengthen drying time between coats — never sand damp mud. Setting-type mud is less humidity-dependent because it cures chemically, which makes it the dependable choice for repairs that need to be solid before the skim goes on.
Before you buy, size the job with the skim-coat finish calculator in our free toolbox — it estimates compound and coat counts for your exact ceiling, so you are not mid-job with the wrong buckets.
Three Compound Mistakes That Wreck a Smooth Finish
Using all-purpose for the final coat. Moderate sandability means it burns and scratches more easily than topping, and its coarser body leaves a surface that takes paint unevenly. Save it for the first skim and the tape; finish with topping at 150–220 grit.
Sanding setting-type mud too early. Setting mud keeps gaining hardness chemically over its full cure time. Sand it green and the paper clogs and the fill tears out; sand it fully cured and you are fighting a low-sandability material. Scrape it flat while wet and let the cure finish.
Using topping compound where you need structure. Topping is not an adhesive and not a filler — it will not hold tape and will not fill a gouge. Reaching for one bucket for the whole job is the fastest route to tape that lifts and cracks that come back.
Frequently Asked Questions
What grit sandpaper goes on each coat?
120–150 grit for the first skim coat of all-purpose or lightweight compound, and 150–220 grit for the topping finish coat. Setting-type mud is shaped wet and scraped flat, not sanded — at most a light pass at 220 grit after full cure to knock off a proud edge.
Can I skim an entire ceiling with setting-type mud?
Technically yes, but practically no: it is low sandability and sets on a timer, so a full-ceiling skim becomes a race against the clock. Use setting mud for gouges, holes, and structural patches; use all-purpose or lightweight for the full skim; finish with topping compound.
All-purpose vs. lightweight compound — which do I buy?
All-purpose is stronger and bonds tape more reliably, which is why it is the standard for embedding tape. Lightweight is easier to sand and shrinks less, which makes it the smoother choice for the first full-ceiling skim. Many crews use both on one job: all-purpose at the seams, lightweight over the field.
Get the layering right and the ceiling tells you — it sands flat, primes evenly, and paint goes on like glass. If you would rather hand the whole restoration to a crew that runs this exact sequence, get matched with a vetted Cary pro or call (984) 228-9926 and we will point you to the right fit for your home.
Prefer to read the full series? Catch up on the mud-roller workaround for painted popcorn, then continue to the angled-light inspection trick that finds every flaw before primer.