The 5-Minute Lighting Trick Pros Use to Find Ceiling Flaws
Your ceiling can look flawless under the room lights and still be full of problems the paint will expose the moment it goes on. Tape-joint ridges, screw pops, and sanding swirls all hide from straight-down light — and all of them show up instantly under a raking beam. That is why the last step before primer is not more sanding; it is five minutes with a work light.
Why Overhead Lighting Hides Surface Flaws
Standard overhead fixtures — a ceiling mount, recessed cans, a fan light — aim their beams straight down at the floor. The light hits the ceiling at nearly a right angle, so a low ridge or a shallow dip casts no shadow you can see from below. Slide 8 of our Popcorn Extraction Masterclass makes the point directly: standard overhead lighting obscures surface flaws.
The short version
- Standard overhead lighting hits the ceiling at nearly a right angle, so tape-joint ridges, screw pops, and sanding swirls cast no shadow you can see from below.
- The trick is to rake two work lights across the ceiling from opposite ends of the room, or hold a bright flashlight nearly flat against it, and mark each flaw with a light pencil circle.
- The inspection takes about five minutes per room and should be repeated from the other direction, since a ridge that hides from one angle can be obvious from the opposite one.
- Screw pops must be driven below the surface before high-build primer: fill the dimple, feather the edges outward, and add a fresh screw an inch or so away if the fastener has lost its grip.
- Sanding runs 120–150 grit after the first skim and 150–220 grit after the topping coat, with raking-light inspection repeated between coats rather than only at the end.
- Post-primer is the last cheap correction point, since high-build primer fills the pitting sanding leaves behind and paint, even flat paint, reveals every remaining dip instead of hiding it.
Ridges and hollows only become visible when light grazes across the surface at a shallow angle, the way low evening sun makes every bump in a lawn obvious. On a ceiling, that means the light has to come from the side, aimed nearly parallel to the plane of the drywall.
The 5-Minute Trick: Rake the Ceiling with Angled Work Lights
After the final sanding pass and before any primer, set two work lights on the floor at opposite ends of the room — or hold a bright flashlight nearly flat against the ceiling, aimed across the surface. Walk the perimeter and watch what the grazing beam reveals: tape joints that sit a fraction high, screw dimples, and the faint swirls left by a hurried sanding pass.
Mark each flaw with a light pencil circle as you find it, then repeat from the other direction — a ridge that hides from one angle can shout from the opposite one. The whole inspection takes about five minutes per room, and it is the cheapest insurance on the job. The deck calls it exactly what it is: revealing hidden imperfections through directional lighting.
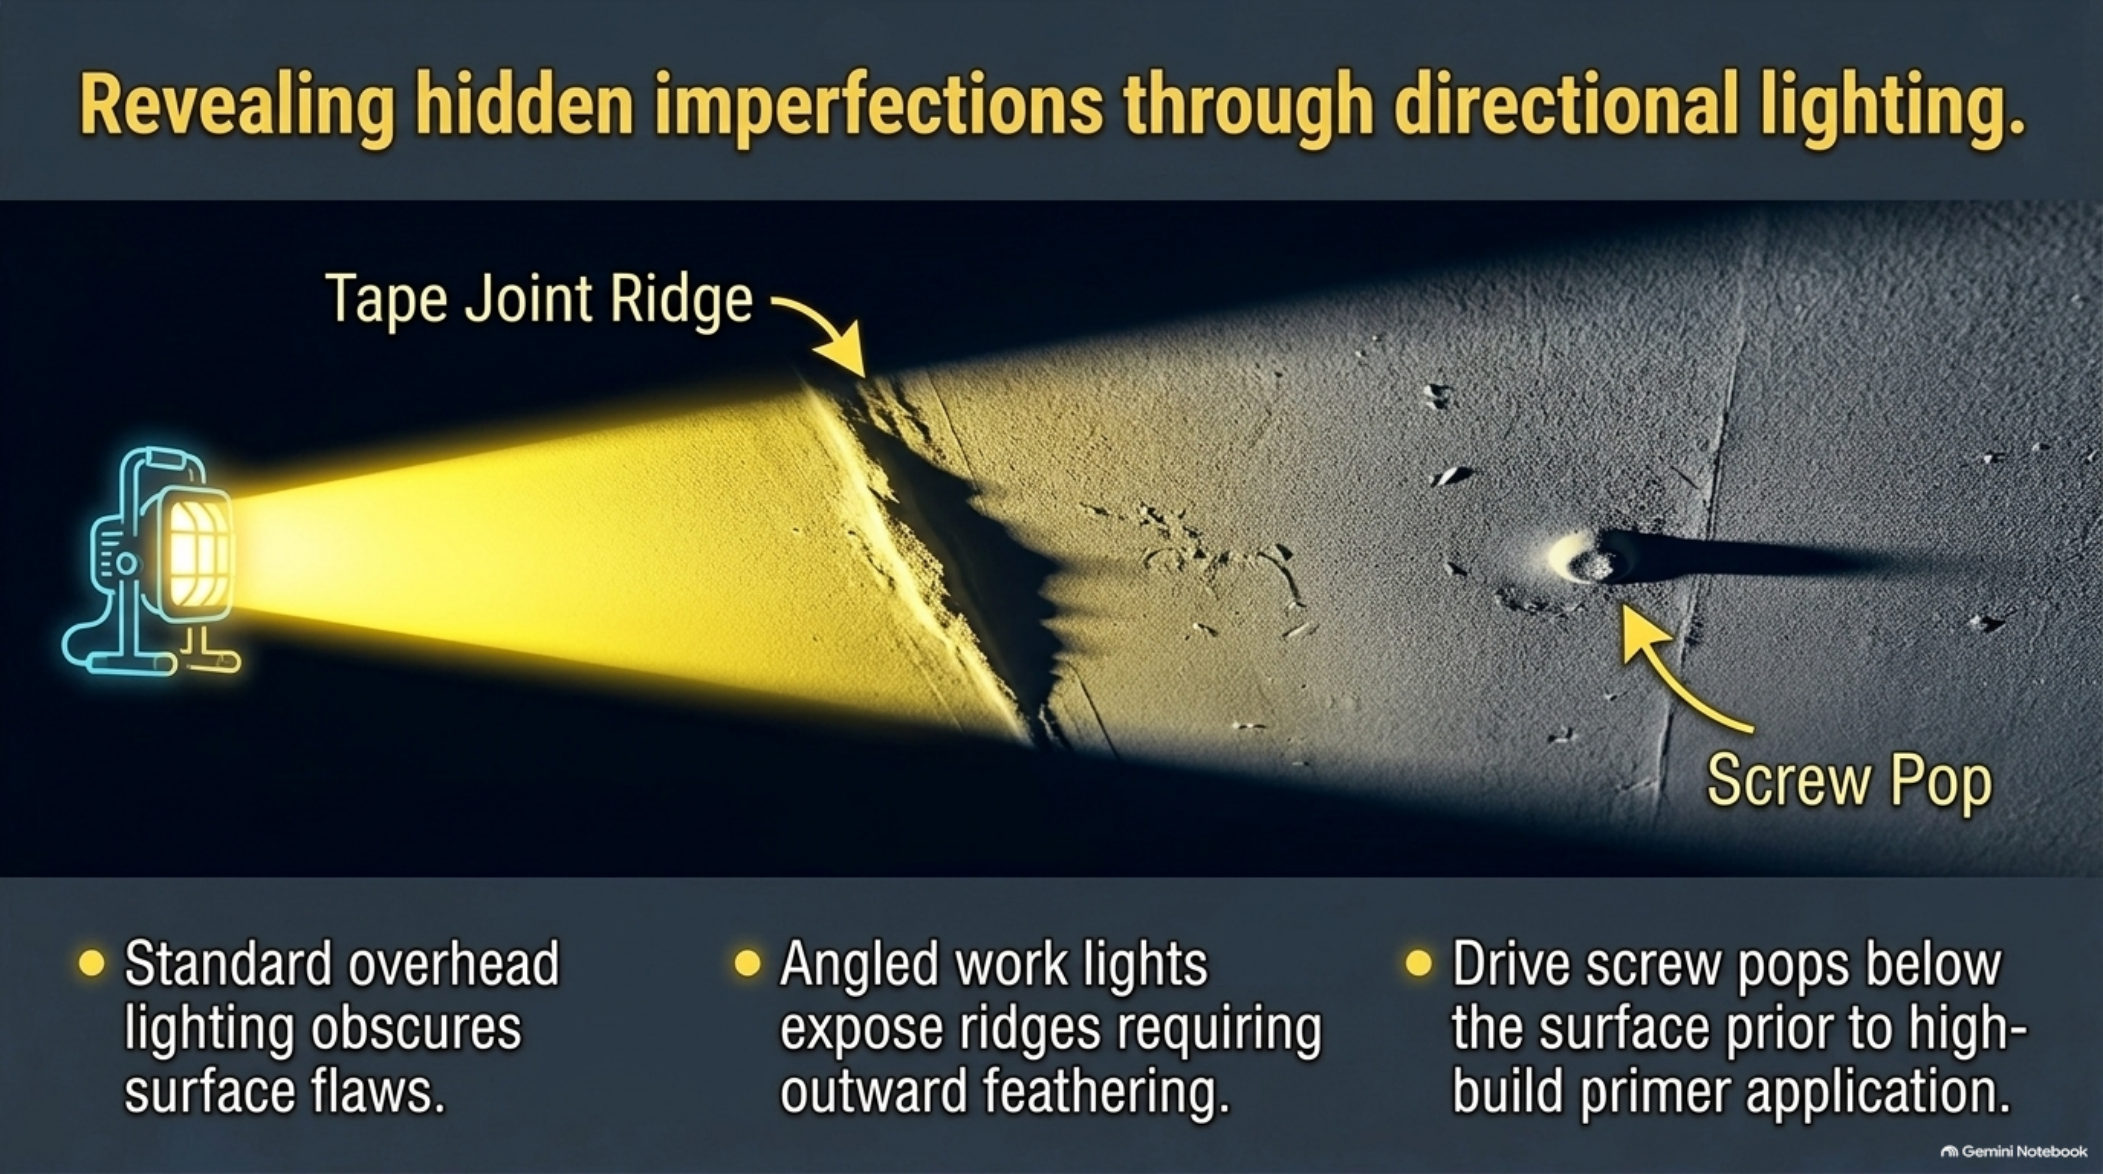
Slide 8 — directional lighting exposes the flaws overhead fixtures hide. See the full deck walkthrough.
Screw Pops: Drive Them Below the Surface Before Primer
A screw pop is a fastener head that has worked its way above the plane of the drywall — or the paper around it has torn — and no amount of overhead light will hide it once the paint is down. The masterclass rule is unambiguous: drive screw pops below the surface prior to high-build primer application.
For a head sitting proud, drive it just below the paper without tearing, then fill the dimple. For a screw that has lost its grip entirely, add a fresh screw an inch or so away, set it below the surface, and fill both spots. Use the right mud for the fill — our joint compound guide covers which product belongs in a dimple — and feather the edges outward so the patch never telegraphs through the finish.
Sand Between Coats, Inspect Between Coats
Inspection is not a one-time event. Rake the lights across the ceiling between coats, not just at the end: after the first skim at 120–150 grit to catch ridges before the topping coat locks them in, and again after the topping coat at 150–220 grit to find swirls and proud edges. Tape joints deserve special attention — a ridge at a seam is fixed by feathering the compound outward across the joint and sanding it flat, never by digging a hollow beside it.
And trust your hand as well as your eye: run your fingers over suspect spots, because the hand finds what flat light misses. Keep your mask and drop cloths down through every sanding pass and the inspection — the dust does not stop being a hazard because the coat is finished.
Prime First, Then Inspect Again — Paint Hides Nothing
The inspection happens before a high-build primer coat for a reason: primer is the last layer that can still be corrected cheaply. High-build primer is thicker-bodied than standard primer, so it fills the microscopic pitting and pinholes that sanding leaves behind, and it evens out the suction across old patches and fresh mud.
After the primer dries, rake the lights one more time. What looked acceptable in raw mud can show up as a shadowed dip once the surface has a uniform sheen — mark it, spot-fill with topping compound, sand at 220 grit, and spot-prime before the finish paint. Paint, flat or glossy, reveals everything: it is the final inspection, not a hiding layer.
Plan the coating side of the job with the free tools on our homeowner toolbox, including the skim-coat finish calculator.
Frequently Asked Questions
Why does my ceiling look fine until we paint it?
Because raw drywall and mud are matte and scatter light, while paint — even flat paint — adds a uniform sheen that makes surface variations visible. The flaws did not appear; the light changed. That is why pros rake the surface with angled work lights before primer instead of discovering the problem under the first coat of paint.
How far should I feather a tape-joint ridge?
Wide. Feather the compound outward across the seam on both sides, building each coat a little wider than the last, until the repair blends into the surrounding field — then sand it flat. A narrow patch leaves an edge that reads as a new ridge the moment raking light crosses it.
Do I need high-build primer, or will regular primer do?
On a skim-coated ceiling after popcorn removal, high-build primer is worth it: its higher solids fill hairline scratches and pinholes that regular primer would leave for the paint to show. Apply it, inspect again under raking light, and fix anything it reveals before the finish coats go on.
Five minutes of raking light before primer saves a repaint after it. If the sanding, feathering, and inspection feel like a second job on top of the removal, get matched with a vetted pro in the Cary area who runs this exact sequence — or call (984) 228-9926 and we will help you find the right crew. Once the ceiling is painted and flawless, keep it that way with our popcorn ceiling maintenance guide.
Prefer to read the full series? Start with the joint compound guide that picks the mud for each layer, then follow the job through to asbestos-safe disposal of the debris.